Vinyl flooring, and particularly luxury vinyl plank and luxury vinyl tile, has exploded in popularity over the past decade, and it’s easy to see why. It looks stunning, handles moisture brilliantly, feels comfortable underfoot, and comes in an enormous range of styles that convincingly mimic wood, stone, and tile at a fraction of the cost. It’s in kitchens, bathrooms, living rooms, and commercial spaces worldwide. But the cleaning requirements of vinyl floors differ meaningfully from both hardwood and tile, and most people clean them using approaches designed for one of those other surfaces.
Once you understand what vinyl floors need and what they absolutely don’t, keeping them looking pristine is genuinely straightforward. This complete guide covers everything from daily maintenance to deep cleaning, stain removal to long-term protection. Let’s get your vinyl floors looking their absolute best!
Understanding Vinyl Flooring Before You Clean It
Before picking up a single cleaning tool, understanding what vinyl flooring actually is, how it’s constructed, what protects it, and what makes it vulnerable, gives you the foundation to make every correct cleaning decision automatically.
The Different Types of Vinyl Flooring
Vinyl flooring encompasses several distinct product types that share the same core material but differ meaningfully in their construction, installation method, and cleaning requirements. Sheet vinyl is the traditional form, a continuous roll of vinyl installed across a floor surface without seams in smaller rooms. Its seamless nature makes it highly water-resistant across the entire floor surface, but the edges and any seams in larger rooms remain vulnerable to moisture penetration. Sheet vinyl is common in older homes and commercial kitchens and typically has a thinner construction than modern luxury vinyl products.
Vinyl composition tile, the flat, square tiles common in commercial and institutional settings, offers a different cleaning profile. It’s typically less water-resistant than sheet vinyl and often requires periodic stripping and recoating with commercial floor finish to maintain its appearance.
Luxury vinyl plank, LVP, is the product that has driven vinyl flooring’s massive resurgence in residential interiors. Designed to convincingly mimic hardwood flooring in both appearance and format, LVP consists of individual planks that click together without adhesive, creating a floating floor installation. The click-lock joints between planks are the primary vulnerability in LVP floors. Water that penetrates these joints can reach the subfloor, causing moisture-related problems even in a product marketed as waterproof.
Luxury vinyl tile, LVT, follows the same construction principles as LVP but in a tile format, often designed to mimic stone or ceramic tile appearances. When installed with grout lines, LVT requires attention to the grout as well as the tile surface, though vinyl-compatible grout is more resilient than standard cement grout.
The Construction That Determines Cleaning Requirements
Understanding vinyl flooring’s layered construction explains why certain cleaning approaches cause damage, and others don’t. Modern luxury vinyl products consist of a backing layer that provides stability and sound absorption, a rigid or semi-rigid core layer, typically limestone composite or wood-plastic composite, that gives the plank its dimensional stability, a printed decorative layer that carries the visual design, and most importantly, the wear layer, a clear protective coating of polyurethane or aluminum oxide that sits on top and determines the floor’s resistance to scratching, staining, and chemical exposure.
The wear layer is everything in vinyl floor care. It’s what you’re walking on, what cleaning products contact, and what determines the floor’s long-term appearance. Wear layers vary in thickness from around 6 mil in budget products to 20 mil or more in commercial-grade luxury vinyl. Thicker wear layers are more resistant to scratching and abrasion, but no wear layer is impervious to the right wrong product or cleaning method. The goal of every vinyl floor cleaning decision is to clean effectively while preserving the wear layer’s integrity.
How Vinyl Differs From Hardwood, Laminate, and Tile
Vinyl flooring occupies a unique position in the flooring ecosystem and its cleaning requirements reflect that unique position. Unlike hardwood, vinyl is genuinely waterproof through its thickness, a significant advantage in kitchens and bathrooms. Unlike laminate, whose fiberboard core swells irreversibly when moisture penetrates the joints, vinyl’s core is dimensionally stable in the presence of moisture. Unlike ceramic tile, vinyl’s wear layer surface is sensitive to abrasive cleaning tools and harsh chemicals that tile handles without issue.
The practical implications: vinyl can handle more moisture in cleaning than hardwood or laminate, but its wear layer surface requires gentler cleaning chemistry and tools than tile. It sits between these materials in terms of cleaning sensitivity, more forgiving than wood-based products, more delicate than fired ceramic or porcelain.
Common Problems Caused by Incorrect Cleaning
The most frequently reported vinyl floor problems caused by cleaning errors are surface dulling from abrasive tools or harsh chemicals that degrade the wear layer finish, yellowing or discoloration from ammonia-based or bleach-based cleaners that react with the vinyl chemistry, surface warping or lifting at edges from steam cleaning that drives heat into the adhesive or click-lock joints, residue buildup from highly concentrated cleaning solutions that leave a film on the wear layer, and scratching from grit ground across the surface by mopping before dry sweeping.

Essential Tools and Products for Vinyl Floor Cleaning
The right tools make vinyl floor cleaning efficient, effective, and safe. The wrong tools, even the ones most commonly used, are among the primary causes of the problems described above.
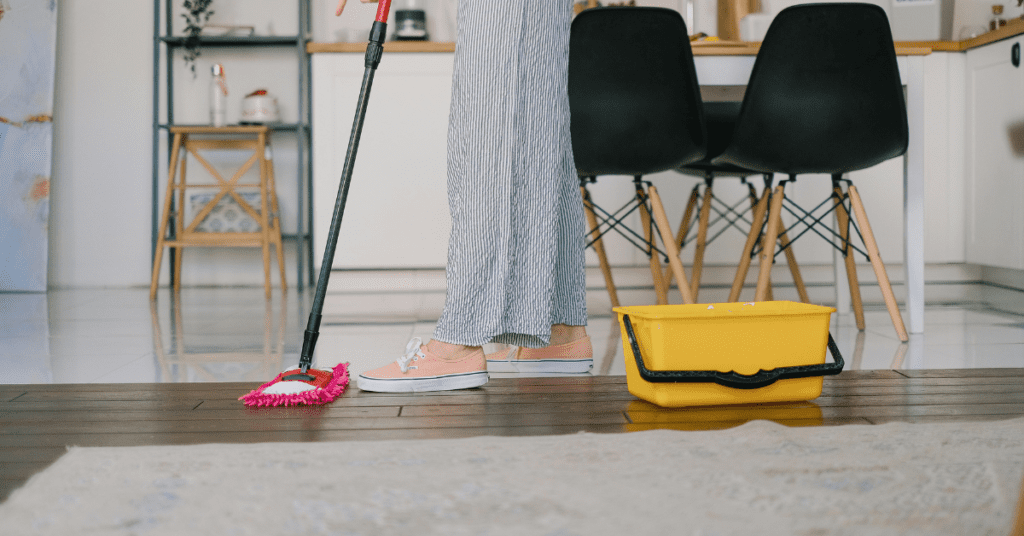
The Microfiber Flat Mop: The Essential Tool
The flat microfiber mop is the definitive cleaning tool for vinyl floors. Its flat pad maintains consistent contact with the floor surface across its entire cleaning area, picking up rather than redistributing fine debris, distributing cleaning solution evenly and with controlled moisture levels, and gliding smoothly without the aggressive friction of a string mop or scrubbing pad. The microfiber material’s microscopic fiber structure traps particles rather than pushing them around, making each pass genuinely cleaner than the last, rather than simply moving contamination across the floor.
Choose a flat mop with a washable, replaceable microfiber pad and a swivel head that reaches under furniture without requiring the floor surface to be cleared entirely. The Bona Microfiber Floor Mop, the O-Cedar ProMist Max, and the Swiffer WetJet Wood are all excellent choices for vinyl floor cleaning at different price points.
Vacuuming for Vinyl: What Matters
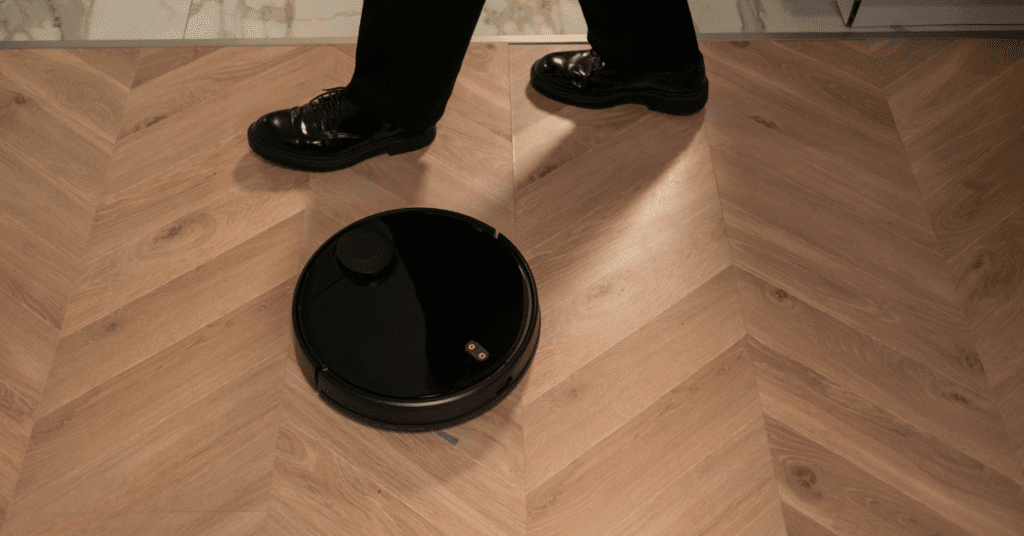
Regular vacuuming is as important for vinyl floor maintenance as for any other floor type. The fine grit and debris that accumulates on vinyl floors acts as an abrasive agent underfoot, grinding against the wear layer with every step and producing micro-scratches that accumulate over time into widespread surface dullness. Always use the hard floor setting on your vacuum before using it on vinyl. This disengages the rotating beater bar that agitates carpet fibers and will scratch and dull a vinyl wear layer if left running. Use a soft-bristle hard floor attachment rather than any attachment with stiff bristles or rough edges.
A robot vacuum set to run daily on vinyl floors is one of the most effective investments for vinyl floor maintenance, removing the daily grit accumulation before it has time to cause wear layer damage.

Products and Tools to Avoid Completely
Several product categories should never contact vinyl floors. Ammonia-based cleaners, including many glass cleaners and general surface sprays, cause vinyl to yellow and degrade the wear layer chemistry with repeated use. Bleach discolors and damages the vinyl’s decorative layer permanently. Abrasive scrubbing pads, steel wool, and stiff-bristled brushes scratch the wear layer irreversibly. Wax and polish products, designed for hardwood, clog the vinyl surface and create a hazy, difficult-to-remove film. Oil-based cleaners and furniture polishes leave an oily residue that dulls the surface and attracts dirt. And steam mops drive heat into the vinyl surface and joints, causing warping, delamination, and adhesive failure, more on this critical point below.
How to Clean Vinyl Floors: The Complete Step-by-Step Process
With the right tools assembled and your floor type understood, this is the complete cleaning process that delivers excellent results while protecting your vinyl floors from damage.
Step 1: Dry Sweep or Vacuum
This step is mandatory before any wet cleaning, and skipping it is one of the most common sources of vinyl floor wear layer damage. Every particle of grit, sand, and hard debris on the floor becomes abrasive under a damp mop, grinding across the wear layer surface with each pass and producing microscopic scratches that accumulate over time. A thorough dry sweep or vacuum removes all of this before it can cause damage.
Use a microfiber dry mop or your vacuum on the hard floor setting. Work methodically across the entire floor area, paying particular attention to the edges along baseboards, corners, and under furniture overhang, where the finest, most abrasive debris concentrates. This step takes two to three minutes and prevents the kind of progressive wear layer damage that makes vinyl floors look dull and aged long before their time.
Step 2: Choose the Right Cleaning Solution
For most everyday vinyl floor cleaning, the choice is simple: a commercial vinyl floor cleaner, a few drops of mild dish soap in warm water, or a dilute apple cider vinegar solution for ceramic-tile-effect vinyl. The key requirement across all options is that the solution is pH-neutral or close to it, appropriately diluted, and residue-free. Avoid concentrated solutions, the cleaning effectiveness of vinyl floor cleaners doesn’t increase proportionally with concentration, and the residue risk does.
For LVP with wood-effect surfaces, a wood floor cleaner like Bona Hardwood Floor Cleaner is safe and appropriate. For sheet vinyl, most general hard floor cleaners work well. For LVT with grout lines, pay additional attention to the grout. Vinyl-compatible grout cleaner applied periodically maintains the grout lines alongside your regular tile surface cleaning.
Step 3: The Correct Mopping Technique for Vinyl
Vinyl floors are more forgiving of moisture than hardwood or laminate, but this doesn’t mean soaking them is acceptable. A moderately damp mop is appropriate for vinyl, damper than you’d use on hardwood, but still well short of the dripping-wet string mop that deposits standing water on the floor. Wring your microfiber mop pad thoroughly before each pass, and aim for a moisture level that leaves the floor damp but not visibly wet.
Mop in the direction of the plank or tile pattern, with the grain on wood-effect LVP, or in consistent parallel passes on sheet vinyl. This produces the most uniform cleaning result and avoids pushing cleaning solution into joints from an angle that increases penetration risk. Apply light, consistent pressure throughout each pass, pressing too hard on textured vinyl surfaces can force cleaning solution into the surface texture.
Step 4: Working in Sections
For larger floor areas, working in manageable sections of 4 to 6 feet rather than attempting to mop the entire floor in a single continuous session produces more consistent results. Each section gets the appropriate amount of cleaning solution and attention before the solution can dry or become cold and less effective. Starting at the far end of the room and working toward the exit ensures you never walk on freshly cleaned sections during the mopping process.
Step 5: Rinsing to Prevent Residue Buildup
Unlike hardwood and laminate, where even a minimally damp rinse pass carries moisture risk, vinyl floors handle a clean water rinse pass well, and for floors cleaned with soap-based solutions, a rinse pass is genuinely recommended to remove any residual soap before it dries on the surface. Use a clean microfiber mop pad dampened with plain warm water, wring thoroughly, and make a final pass over the mopped section. This step is particularly important for kitchen and bathroom vinyl floors, where the cleaning solutions used tend to be slightly more concentrated to address grease and grime.
Step 6: Drying Properly
After mopping, vinyl floors should air-dry naturally within a few minutes, given appropriate moisture levels during mopping. For areas where moisture has been applied more generously, around spill treatment areas or during a deeper clean, drying with a clean, dry microfiber cloth or a dry mop pass accelerates drying and removes any residual streaking. Ensure the floor is completely dry before replacing furniture, area rugs, or any other items placed on the floor surface.
How Often to Clean Vinyl Floors
Daily: a dry sweep or robot vacuum pass in high-traffic areas removes the grit accumulation that causes progressive wear layer damage, the most important daily habit for vinyl floor longevity. Weekly: a thorough dry sweep of the entire floor followed by a damp mop with your chosen cleaning solution maintains floors in a genuinely clean condition. Monthly: targeted attention to edges, corners, under furniture, any developing staining, and the grout lines in LVT installations. Every three to six months: a deeper clean addressing accumulated product residue and a thorough assessment of the floor’s wear layer condition.
How to Remove Common Stains from Vinyl Floors
Vinyl floors are more stain-resistant than most floor types thanks to the non-porous wear layer surface, but stains do happen, and the right treatment for each type makes the difference between complete removal and a permanent mark.
The Universal Rule: Act Quickly
Before addressing specific stain types, one principle applies to all of them: act immediately. Vinyl’s wear layer is non-porous and resistant to staining when the stain is fresh. Most substances can be completely removed if addressed promptly. The same substances become significantly harder to remove once they’ve had time to dry, harden, or chemically interact with the wear layer surface. Keep a spray bottle of your regular cleaning solution and a clean microfiber cloth accessible in the kitchen and bathroom, specifically for immediate spill response.
Scuff Marks and Heel Marks
Scuff marks from rubber-soled shoes, furniture movement, and appliances are among the most common vinyl floor blemishes. Most scuffs are surface-level marks in the wear layer that respond well to gentle treatment. Try rubbing the scuff with a clean pencil eraser first. This works on many lighter scuffs without any chemical input. A small amount of rubbing alcohol on a clean microfiber cloth handles more stubborn scuffs effectively on most vinyl surfaces. A damp melamine foam eraser is also excellent on glazed vinyl surfaces for scuff marks that resist other approaches. Always wipe the treated area clean with your regular floor cleaner after scuff removal to remove any residue.
Grease and Cooking Oil
Fresh cooking grease on vinyl should be blotted immediately with paper towels or absorbent cloth, never rubbed, as rubbing spreads the stain and potentially drives it toward joints. After blotting, apply a small amount of dish soap directly to the spot, work it gently into the grease with a soft cloth, and wipe clean with a warm, damp cloth. For dried or set grease, a slightly stronger dish soap solution is applied and allowed to dwell for a few minutes before gentle scrubbing with a soft cloth removes most cooking oil staining effectively.
Wine, Juice, and Food Stains
These stains respond most completely to immediate action. Blot any liquid spill thoroughly before attempting any cleaning. Once the liquid is removed, clean with your regular vinyl floor cleaner on a microfiber cloth. For dried food stains, soften first with a warm, damp cloth, then clean with a mild dish soap solution. For tannin stains from wine, tea, or dark juice that have dried and set, a small amount of rubbing alcohol on a cloth is usually effective, dab rather than rub, work patiently, and wipe clean with plain water after the stain lifts.
Ink and Marker Stains
Ink and permanent marker on vinyl floors respond well to rubbing alcohol. Apply a small amount to a clean white cloth and dab carefully onto the stained area. Avoid aggressive rubbing, which can damage the wear layer finish on some vinyl products. Work the alcohol into the stain with patient dabbing and blotting rather than scrubbing. For inks that rubbing alcohol doesn’t fully resolve, a small amount of acetone or nail polish remover, applied very carefully and sparingly, can lift the remaining stain, but test in an inconspicuous area first, as acetone can affect some vinyl wear layer finishes.
Pet Stains and Urine
Pet urine on vinyl floors is less structurally damaging than on hardwood or laminate. The non-porous wear layer prevents deep penetration, but requires prompt and thorough cleaning for complete odor elimination. Blot immediately and thoroughly with an absorbent cloth. Clean the area with an enzymatic pet stain cleaner formulated for hard floors. Enzymatic cleaners break down the uric acid compounds biologically, eliminating the odor at its molecular source rather than masking it. Avoid ammonia-based cleaners for pet stain treatment on vinyl. Ammonia can react with urine residue and damage the wear layer surface, and the smell of ammonia attracts pets back to the same spot.
Rust Stains
Rust stains from metal objects left on vinyl floors, furniture feet, appliance bases, and metal accessories respond well to oxalic acid-based treatments. Bar Keepers Friend, made into a paste with a small amount of water, applied to the rust stain and left for several minutes before gentle scrubbing and rinsing, is highly effective. Lemon juice applied directly to a lighter rust mark and left for 10 to 15 minutes is a natural alternative. Never use steel wool or abrasive pads to address rust stains on vinyl, the mechanical abrasion causes wear layer scratching that is worse than the original stain.
Paint and Nail Polish
Fresh water-based paint wipes up easily with a damp cloth while still wet. Dried water-based paint can be softened with warm water and carefully removed with a plastic scraper held at a very low angle, never a metal scraper. For oil-based paint or nail polish, rubbing alcohol or acetone applied carefully on a cloth removes the material effectively. Use sparingly, work in a well-ventilated area, and clean the treated area thoroughly afterward with your regular floor cleaner.

The Biggest Vinyl Floor Cleaning Mistakes to Avoid
These are the cleaning errors that cause the most damage to vinyl floors, and the most frustration for homeowners who don’t realize the source of their floor’s deteriorating appearance.
Using Too Much Water at Seams and Edges
Vinyl flooring’s core material is waterproof, but the joints between LVP planks and the edges around the perimeter of any vinyl installation are potential entry points for water to reach the subfloor below. Excess water applied during cleaning gravitates toward these joints and edges, and while vinyl won’t suffer the immediate catastrophic swelling of laminate flooring, persistent moisture penetration through seams can cause subfloor moisture issues, mold development under the floor, and eventual adhesive or joint failure in glue-down and click-lock installations, respectively. Use a moderately damp, not wet, mopping technique, avoid directing cleaning solution toward seams, and ensure the floor dries completely after cleaning.
Steam Mopping: The Most Damaging Mistake
Steam mops are marketed as an ideal solution for hard floor cleaning, and they work well on ceramic tile and stone. On vinyl floors, they are one of the most reliably damaging cleaning tools available. The high-temperature steam drives heat into the vinyl surface, softening the wear layer, stressing the adhesive bonds between the floor’s layers, weakening the click-lock joints in floating LVP installations, and in some cases causing the floor to warp, lift, or delaminate. This damage is progressive and cumulative. A vinyl floor that has been steam-mopped repeatedly shows progressive surface changes that are not reversible without replacing the affected planks or sections. No vinyl flooring manufacturer recommends steam mopping, and most explicitly void the warranty for floors that have been steam mopped. Under no circumstances should steam be applied to any vinyl floor surface.
Ammonia and Bleach-Based Cleaners
Ammonia is one of the most common ingredients in general household cleaners and glass cleaners, and one of the most damaging substances for vinyl floors with repeated use. Ammonia causes vinyl to yellow progressively and degrades the wear layer’s chemical structure over time. Bleach causes discoloration and permanent damage to vinyl’s decorative layer, bleaching out color and pattern from the floor surface. Even diluted bleach solutions used for occasional disinfection cause cumulative damage to vinyl wear layers with regular application. Always use cleaners specifically formulated for vinyl or resilient flooring, the price difference is negligible, and the benefit to the floor’s longevity is significant.
Abrasive Scrubbing Tools
Steel wool, abrasive scrubbing pads, stiff-bristled scrub brushes, and any rough cleaning surface used directly on vinyl cause micro-scratches in the wear layer that accumulate into widespread surface dullness over time. The wear layer of vinyl flooring is hard but not impervious to abrasion. The same fine scratches that affect glass surfaces affect vinyl wear layers, and once scratched, the surface appearance change is permanent without replacing the affected planks. Always use soft cloths, microfiber materials, and gentle soft-bristled brushes on vinyl floors.
Wax and Polish Products
Vinyl floors do not benefit from wax or polish, and applying wax-based products to vinyl creates a persistent problem. Wax bonds to the vinyl surface in a way that the wear layer chemistry doesn’t accommodate, producing a cloudy, uneven film that dulls the floor’s appearance, attracts dirt aggressively, and is very difficult to remove without aggressive stripping that risks wear layer damage. If your vinyl floor has lost its natural shine, residue removal and, if necessary, plank replacement are the appropriate remedies, not the application of wax or polish.
Skipping the Dry Sweep
Mopping a vinyl floor without prior dry sweeping is counterproductive and damaging. Hard grit and debris under a mop acts as sandpaper against the wear layer. Each mopping pass grinds the particles across the surface and creates fine scratches that compound over time. The solution is completely free and takes two minutes: always dry sweep or vacuum before mopping. Every single time. This single habit has a more positive impact on vinyl floor longevity than almost any product choice.
Natural and DIY Vinyl Floor Cleaning Solutions
For households that prefer minimal chemical exposure or want cost-effective alternatives to commercial products, these natural solutions clean vinyl floors safely and effectively.
Warm Water and Dish Soap
This is the most effective and most accessible vinyl floor cleaning solution available, and it costs nothing essentially. A few drops, genuinely just a few drops, of mild dish soap dissolved in a bucket of warm water provides excellent surfactant action for lifting grease and general floor grime without leaving significant residue at proper dilution. The surfactants in dish soap are specifically engineered to emulsify oils and grease, making this solution ideal for kitchen vinyl floors. Always use very dilute, no visible sudsing in the water, and follow with a clean water rinse pass for best results.
Apple Cider Vinegar Solution
A solution of half a cup of apple cider vinegar per gallon of warm water is a gentle, natural cleaner for vinyl floors that cuts through light grease and general grime without the wear layer concerns that white vinegar’s higher acidity can present with very frequent use. The mild acidity of apple cider vinegar at this dilution is safe for vinyl surfaces and effective on mineral deposits and light soiling. It leaves a clean, fresh result without residue. Use it for regular weekly cleaning as an alternative to commercial products.
Rubbing Alcohol Solution
A solution of one part rubbing alcohol to four parts water applied with a barely damp microfiber mop is arguably the best natural streak-free cleaning solution for vinyl floors. The alcohol evaporates quickly, minimizing moisture contact time with the floor surface, leaves absolutely no residue, and produces excellent streak-free results on the vinyl wear layer. This solution is particularly effective for the quick-dry, streak-free result that kitchen and bathroom vinyl floors benefit from after damp cleaning.
Baking Soda for Targeted Stain Removal
A paste of baking soda and a small amount of water applied directly to a stubborn stain on vinyl, left for several minutes, then gently rubbed with a soft cloth, is safe and moderately effective for surface-level staining. The mild abrasiveness helps lift contamination without scratching the wear layer when used gently. Rinse thoroughly after treatment to remove all baking soda residue.
What Natural Cleaners to Avoid on Vinyl
Despite the general appeal of natural cleaning solutions, several are specifically unsuitable for vinyl floors. Undiluted white vinegar, despite being a popular floor cleaner, is acidic enough to cause progressive wear layer dulling with frequent use on vinyl. Lemon juice carries the same acidity concern. Essential oil-based cleaners at high concentrations can leave oily residue. And baking soda used as a broad floor scrub rather than a targeted spot treatment can cause micro-scratching on some vinyl wear layer finishes.
Vinyl Floor Cleaning by Floor Type
Sheet Vinyl
Sheet vinyl’s greatest cleaning advantage is its seamless surface, with no joints for cleaning solution to penetrate in most smaller room installations. Clean sheet vinyl with a moderately damp microfiber mop and your chosen vinyl-appropriate cleaning solution, working in parallel passes across the floor. Pay particular attention to the edges of the sheet where it meets the baseboards. These transition points accumulate grime and are the most common areas for moisture to work under the sheet over time. Use a soft brush to clean the edge detail periodically.
Luxury Vinyl Plank
LVP cleaning requires particular attention to the click-lock joints between planks. Avoid directing excess cleaning solution toward these joints, and ensure your mop is sufficiently wrung out that no standing moisture accumulates in the joint channels. For the plank surfaces themselves, clean in the direction of the plank pattern, with the grain on wood-effect products, for the most streak-free result and the gentlest treatment of the wear layer surface texture. The wood-effect embossing on LVP can trap fine debris. A soft brush used gently along the embossed grain periodically helps dislodge embedded particles that mopping alone doesn’t fully address.
Luxury Vinyl Tile
LVT cleaning requires attention to both the tile surfaces and, where applicable, the grout lines between tiles. The tile surfaces are cleaned with the same approach as LVP, a moderately damp microfiber mop with a vinyl-appropriate cleaning solution. For grout lines in LVT installations, use a soft grout brush periodically to address the accumulation that mopping doesn’t reach. Avoid harsh grout cleaners designed for ceramic tile grout, these often contain acids or bleach that damage vinyl surfaces. Use a vinyl-compatible grout cleaner or a dilute dish soap solution with the grout brush for safe, effective grout line maintenance.
Textured Vinyl Floors
Textured and embossed vinyl surfaces, particularly those mimicking stone or rustic wood, present a cleaning challenge because their surface relief creates more area for dirt to accumulate and hide. Use a soft brush with your cleaning solution on textured vinyl to work the cleaner into the surface texture before mopping clean. A handheld steam cleaner, directing the steam briefly at the textured surface from a slight distance rather than pressing the attachment against it, loosens embedded debris from surface texture without the contact time risk of a steam mop.
Vinyl in Wet Areas
Kitchen and bathroom vinyl floors require more frequent cleaning, given the moisture, grease, and humidity exposure of these environments. In bathrooms, ensure adequate ventilation, running the exhaust fan during and after showering reduces the ambient humidity that, over time, works into edges and transitions. In kitchens, the immediate spill response habit is particularly important. Cooking oil and food acids left on vinyl floors become progressively harder to remove as they cool and set.

How to Deep Clean Vinyl Floors for a Fresh Start
Recognizing When Deep Cleaning Is Needed
Several signs indicate a deep clean is appropriate rather than your routine. A floor that feels slightly sticky or tacky underfoot despite regular mopping has product residue accumulated on the wear layer. A floor that looks dull immediately after cleaning, not just when dirty, has the same issue. Mopping that seems to smear rather than clean indicates residue is preventing the cleaning solution from reaching the actual floor surface. And a floor that has lost its vibrancy and appears grey or flat despite cleaning has either accumulated residue or begun to show wear layer dulling.
Removing Product Residue
The most common deep cleaning task for vinyl floors is removing accumulated cleaning product residue. Years of cleaning, particularly with soap-based solutions used at too high a concentration, leave a film that progressively dulls the surface. To address this, use a commercial vinyl floor deep cleaner or residue remover. Armstrong Once ‘n Done Floor Cleaner is used at a slightly higher concentration than the regular maintenance dilution or a dedicated residue remover product. Apply with a microfiber mop in small sections, working the solution into the floor surface, then follow immediately with a clean warm water rinse to lift and remove the dissolved residue. The improvement in floor appearance when significant residue is removed can be dramatic.
Restoring Shine to Dull Vinyl Floors
For vinyl floors that are clean but have lost their inherent gloss due to wear layer surface wear, particularly in high-traffic areas, a commercial vinyl floor refresher product applies a thin, clear coating that restores shine and provides a degree of fresh surface protection. These products are specifically formulated for vinyl surfaces, distinct from wax or polish, and compatible with vinyl wear layer chemistry. Apply with a flat mop applicator, allow to dry completely, and the result is a visibly refreshed floor surface with restored clarity and gloss.
When Professional Help Is Appropriate
Significant wear layer damage across large areas, widespread lifting or delamination, serious moisture damage to the subfloor accessed through vinyl seams, or extensive staining that no cleaning approach resolves all warrant professional assessment. A professional flooring contractor can evaluate whether individual plank replacement, section replacement, or full floor replacement is the most appropriate and cost-effective solution for your specific situation.
How to Protect and Maintain Vinyl Floors Long-Term
Building Your Maintenance Routine
A sustainable vinyl floor maintenance routine is genuinely simple. Daily: a 60-second dry sweep or robot vacuum pass in high-traffic areas prevents the grit accumulation that causes progressive wear layer damage. Weekly: a thorough dry sweep of the entire floor followed by a moderately damp mop with your chosen cleaning solution. Monthly: focused attention on edges, corners, grout lines in LVT, and any developing staining or residue areas. Every three to six months: a deeper clean addressing accumulated residue and a full wear layer condition assessment.
Rugs, Mats, and Floor Protection
Strategic placement of rugs and mats protects the highest-traffic and highest-risk areas of vinyl floors from concentrated wear and moisture exposure. Place mats at every exterior door, in front of the kitchen sink and cooking area, at bathroom entrances, and in hallway high-traffic paths. Area rugs in living rooms and bedrooms protect large sections of floor from foot traffic wear. Choose rugs with felt or natural fiber backing rather than rubber backing. Rubber backing can cause discoloration on vinyl surfaces with prolonged contact, leaving yellowed marks that are difficult to remove.
Furniture Protection
Felt adhesive pads on every furniture leg protect vinyl floors from the scratching and indentation that concentrated point loads from furniture feet cause on softer vinyl wear layers. This is particularly important on lower-specification vinyl products with thinner wear layers. Heavy furniture with small contact feet, such as some metal chair legs, for example, can cause permanent indentation in vinyl over time. Wide, flat felt pads distribute the load across a larger surface area and protect against this. Replace felt pads every six to twelve months as they compress and thin.
Temperature and Sunlight Management
Vinyl floors are more sensitive to temperature extremes and prolonged direct sunlight than most homeowners realize. Extreme heat, from direct sunlight through large windows, from heating vents directed at floor level, or from any heat source positioned close to the floor, can cause vinyl planks to expand, warp, or develop surface changes over time. Prolonged UV exposure from direct sunlight causes fading of the decorative layer over months and years, particularly pronounced in rooms with large south-facing windows. Use blinds or UV-filtering window film in rooms with significant sun exposure to protect vinyl floor color and appearance over the long term.
Repairing Minor Damage
Minor scratches in the wear layer can be addressed with vinyl floor repair markers or touch-up kits in matching colors, available from most flooring retailers in a range of wood and stone tones. Small surface scratches filled with repair compound become significantly less visible and stop accumulating debris in the scratch channel. For click-lock LVP, individual planks can be replaced without replacing the entire floor. A significant advantage of floating floor installation is that it makes targeted damage repair practical and affordable.
Conclusion
Vinyl floor cleaning is genuinely one of the most manageable floor care routines available, once you internalize the fundamental principles that govern everything: use gentle, pH-neutral products specifically appropriate for vinyl surfaces, keep heat and harsh chemicals completely away from your floors, and maintain the dry sweep before every single wet cleaning session without exception. Every other correct cleaning decision flows naturally from these foundations.
Take the key lessons from this guide and implement them starting today. Swap your mop for a flat microfiber one. Stop using ammonia-based cleaners and switch to a dilute dish soap solution, an apple cider vinegar solution, or a vinyl-specific product. Dry sweep before you mop every single time without exception. Respond to spills promptly and with the right treatment for the specific stain type. Place felt pads on every piece of furniture. Position mats at every entry point and high-risk zone. Build a simple, realistic daily and weekly routine and follow it consistently.
Your vinyl floors are a beautiful, durable, and genuinely valuable part of your home. They were chosen for both their appearance and their practical performance, and with the right care applied consistently, they’ll deliver on both fronts for years and decades to come. The right cleaning approach costs no more time or money than the wrong one. It just requires knowing what you’re doing. And now you absolutely do. Start today and enjoy the difference!
Check out my Pinterest account for more inspiration!